
Your Guide to Developing Screen Imagery for LED Screen Rentals

Creating captivating screen imagery for LED screens at events is both an art and a science. It demands creativity, technical know-how, and a keen understanding of the event's goals. In this guide, we'll walk you through the entire process of developing stunning content that truly shines on LED screens. From brainstorming your initial ideas to executing the final design, we'll cover everything you need to know to make the most of these dynamic displays. Get ready to dive into the key tips and best practices that will help your visuals leave a lasting impression — let’s go!
Understanding LED Screen Technology
Before creating content, it’s essential to understand the technical specifications and capabilities of LED screens. Key factors like pixel pitch, brightness, contrast and refresh rate play a significant role in how your content will be displayed and perceived.
Determine Pixel Pitch and Resolution
Pixel pitch is the distance between the centers of two adjacent pixels and significantly impacts image clarity and detail. Understanding and matching the screen's resolution to your content is important to provide the best end viewing experience.
Step 1: Identify Pixel Pitch of Your Screen
Identify the pixel pitch of the LED screens you are renting. This information is typically provided by the rental company or found in the screen's technical specifications. You can also measure the pixel pitch of your LED screen by physically measuring the distance (in millimeters) between two adjacent pixels.
Step 2: Match Your Content Resolution to the Pixel Pitch
Why This Matters: The pixel pitch of an LED screen refers to the distance between the centers of two adjacent pixels. A smaller pixel pitch means the pixels are closer together, leading to higher screen resolution and better image clarity.
How to Do It:
Determine the Pixel Pitch: Find out the pixel pitch of the LED screen you'll be using. This information is usually provided by the screen manufacturer or rental company.
Choose the Right Resolution: Based on the pixel pitch, select a content resolution that matches the screen's capability. For example:
If the pixel pitch is 2.5mm, which is relatively small, the screen can display high-resolution content. Creating your content in 1080p (Full HD) or 4K resolution will ensure that it looks sharp and clear.
For larger pixel pitches, lower resolutions might suffice, but higher resolutions generally provide better clarity.
Design for Maximum Impact: Ensure that your content, whether it's images, videos, or graphics, utilizes the high resolution to enhance the visual experience. This means paying attention to details and ensuring all elements are crisp and clear.
Step 3: Create Content in the Screen's Native Resolution
Why This Matters: Each LED screen has a native resolution, which is the exact number of pixels the screen can display horizontally and vertically. Creating content in this native resolution ensures that your visuals will fit perfectly on the screen without any distortion.
How to Do It:
Find the Native Resolution: Obtain the native resolution of the LED screen. This is also typically provided by the manufacturer or rental company. For example, an LED screen might have a native resolution of 1920x1080 pixels.
Design to Fit: Create all your graphics, videos, and images exactly to this resolution. This means if the screen's resolution is 1920x1080, you design your content to be 1920 pixels wide and 1080 pixels tall.
Avoid Resizing or Stretching: By designing to the native resolution, you eliminate the need to resize or stretch your content, which can lead to distortion and a loss of quality. Your visuals will appear as intended, maintaining sharpness and clarity.
Use Appropriate Software: Use design software that allows you to set custom dimensions for your projects, such as Adobe Photoshop, Illustrator, or After Effects. These tools let you create content at the exact resolution required.
Pro Tip
When creating content, always preview it on a smaller scale before finalizing. This helps catch any potential issues with clarity or distortion, ensuring your visuals look perfect on the actual LED screen!
Optimize Brightness and Contrast
LED screens are known for their brightness and high contrast ratios, which can greatly enhance the visual impact of your content. Here’s how to make the most of these features:
Step 1: Use Vibrant Colors and High Contrast Designs
Why This Matters: Bright colors and clear distinctions between light and dark areas make your content more visually appealing and easier to see from a distance.
How to Do It:
Choose Vibrant Colors: Select bright, bold colors that stand out. For example, use rich reds, blues, and greens to make elements pop.
Enhance Contrast: Ensure there is a strong contrast between different elements in your design. For instance, use light text on a dark background or vice versa. This makes your content more readable and striking.
Leverage LED Capabilities: Since LED screens can handle high brightness levels, don’t be afraid to use vivid colors and contrasts. This will make your content more eye-catching.
Step 2: Test Your Content on the LED Screen
Why This Matters: Viewing your content on the actual LED screen allows you to make precise adjustments to brightness and contrast, ensuring it looks great in the specific environment where it will be displayed. From outdoor tailgates to music festivals to corporate events, here’s how to impress your an audience of any size.
How to Do It:
Initial Testing: Once your content is ready, display it on the LED screen as early as possible in the design process.
Adjust Settings: Pay attention to how the colors and contrast appear. Make adjustments to brightness and contrast settings on the screen itself and within your content if needed.
Consider the Environment: Different event environments (indoor vs. outdoor, daylight vs. nighttime) affect how your content looks. Test in conditions similar to the actual event to make the best adjustments.
Step 3: Avoid Over-Saturating Colors
Why This Matters: While bright colors can be effective, too much saturation can lead to visual fatigue for your audience, making your content overwhelming and uncomfortable to view.
How to Do It:
Check Color Saturation: Ensure that your colors are vibrant but not excessively saturated. Overly intense colors can be harsh on the eyes, especially over prolonged viewing periods.
Balance Your Palette: Use a mix of vibrant and more muted colors to create a visually appealing and balanced design. This keeps your content engaging without being overwhelming.
Get Feedback: Show your content to a few people and get their feedback on the color intensity. Adjust based on their responses to find the right balance.
Did You Know?
Excessive brightness can actually detract from the viewing experience. Sometimes, less is more! Overly bright screens can cause glare and make it difficult for viewers to see details clearly. Striking the right balance in brightness ensures a comfortable and enjoyable viewing experience.
Ensure Compatible Refresh Rate
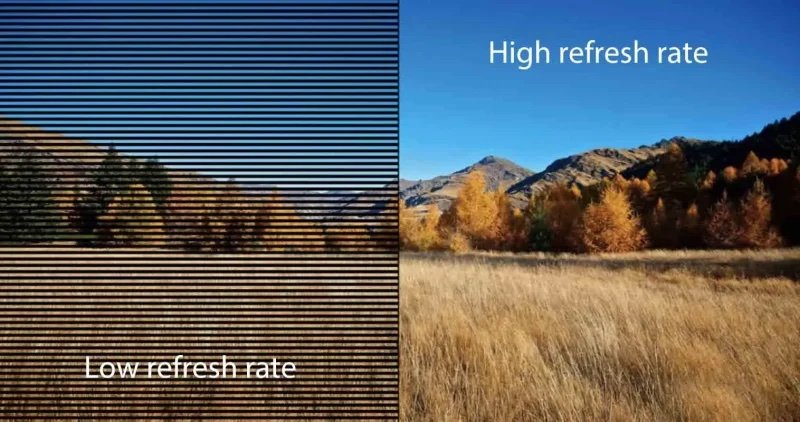
The refresh rate of an LED screen plays a crucial role in how smoothly your content is displayed. A higher refresh rate results in smoother motion, which is particularly important for video content. Here’s how to ensure your content is compatible with the screen’s refresh rate:
Step 1: Check the Refresh Rate of the LED Screens
Why This Matters: Knowing the refresh rate of the LED screen helps you produce content that matches its capabilities, ensuring smooth playback without flickering or stuttering.
How to Do It:
Obtain Specifications: Get the technical specifications of the LED screen from the manufacturer or rental company. This should include the refresh rate.
Typical Refresh Rates: Most modern LED screens have a refresh rate of at least 60Hz. Some high-end models may offer 120Hz or higher. A 60Hz refresh rate means the screen refreshes 60 times per second.
Understand Application Needs: For general presentations, 60Hz is usually sufficient. For high-motion content like videos or live broadcasts, a higher refresh rate might be beneficial.
Step 2: Produce Video Content at a Compatible Refresh Rate
Why This Matters: Creating video content at a refresh rate that matches the screen’s refresh rate prevents playback issues such as flickering or stuttering.
How to Do It:
Set Video Parameters: When creating or editing video content, ensure it’s rendered at a refresh rate that matches or exceeds the screen's refresh rate. For example, if the screen is 60Hz, render your video at 60 frames per second (fps) or higher.
Use Appropriate Tools: Use video editing software that allows you to set specific frame rates, such as Adobe Premiere Pro, Final Cut Pro, or DaVinci Resolve.
Avoid Frame Rate Mismatches: Mismatched frame rates can cause playback issues. If your video is produced at 30fps but played on a 60Hz screen, it might not look as smooth as it could.
Step 3: Test Video Playback to Ensure Smooth Motion
Why This Matters: Testing your videos on the actual LED screen ensures they play smoothly and look as intended, allowing you to make any necessary adjustments before the event.
How to Do It:
Preview Content on the Screen: Play your videos on the LED screen well in advance of the event. Look for any signs of flickering, stuttering, or other playback issues.
Adjust Settings if Needed: If you notice any issues, adjust the frame rate, encoding settings, or video quality in your editing software. Sometimes, small tweaks can significantly improve playback.
Check in Event Conditions: If possible, test under the same conditions as the event (lighting, distance, viewing angle) to ensure everything looks perfect.
Use Frame Blending for Smoother Transitions
Why This Matters: Frame blending is a technique used in video editing to smooth out transitions between frames, which can make motion appear more fluid, especially when working with lower frame rates.
How to Do It:
Enable Frame Blending: Most video editing software has a frame blending option. Enable this feature when exporting your video.
Adjust Blending Settings: Fine-tune the frame blending settings to achieve the best result. This might require some experimentation to get right.
Preview the Result: Always preview the final video to ensure the transitions are smooth and the overall motion is fluid.
Pro Tip
When producing high-motion video content, consider using higher frame rates like 120fps or even 240fps if the LED screen supports it. This can make action sequences and fast movements look incredibly smooth and lifelike, providing a premium viewing experience for your audience.
Content Development Process
Bringing your ideas to life on LED screens is an exciting journey that involves a few key steps. In this section, we’ll walk you through the entire process, from brainstorming your initial concept to perfecting the end design. Let’s get into the essentials of creating visually stunning and impactful content.
Conceptualization and Planning

Understanding the event’s objectives and target audience is the first crucial step. Knowing what you aim to achieve and who will be viewing the content helps guide your design decisions. Start by clarifying your goals—are you looking to inform, entertain, or inspire your audience? Identify the demographics and interests of your audience to tailor your message effectively.
Next, develop a storyboard or visual plan. This step involves outlining the sequence of your content, key messages, and desired visual effects, providing a clear roadmap for the content creation process. Think about the main points you want to convey and the best order to present them, ensuring a logical flow that keeps the audience engaged. Plan any special effects or transitions that will enhance your presentation.
Finally, gather all necessary assets and resources. Collect high-quality images, videos, graphics, and text that are relevant to the event. Ensuring the quality and relevance of these materials is essential for a professional-looking final product. Keep everything well-organized to streamline the content creation process and make it easy to incorporate these elements into your design. By following these steps, you'll be well-prepared to create impactful and visually stunning content for your LED screens.
Remember: Your storyboard is your blueprint. Don’t skip this critical step!
Use Professional Software Tools
Creating high-quality imagery for LED screens requires professional-grade software that offers advanced features for precision and creativity. Here's how to make the most of these tools:
Step 1: Choose the Right Software Tools
Why This Matters: The right tools can significantly impact the quality and efficiency of your work.
Recommended Tools:
Adobe After Effects: Ideal for motion graphics and visual effects. Use it for creating animations, transitions, and complex visual compositions.
Adobe Premiere Pro: Perfect for video editing. It allows you to edit and compile video footage, add effects, and manage audio seamlessly.
Photo editing software: Programs like Photoshop are essential for image editing and graphic design. Use it to create and manipulate images, design layouts, and prepare graphics for use in other software.
Final Cut Pro X & Motion: Apple’s version of video editing and special effects software, made for Mac users.
Step 2: Ensure Your Software is Updated
Why This Matters: Updated software provides the latest features, improvements, and security updates, enhancing your ability to create high-quality content efficiently.
How to Do It:
Regular Updates: Set your software to update automatically or check for updates regularly to ensure you’re using the latest version.
Access New Features: Stay informed about new tools and features that can simplify your workflow and enhance your creative capabilities.
Improved Performance: Benefit from performance enhancements and bug fixes that come with updates, ensuring smoother operation and fewer disruptions.
Step 3: Utilize Available Templates and Plugins
Why This Matters: Templates and plugins can save you time and enhance the quality of your content by adding professional effects and animations with minimal effort.
How to Do It:
Explore Libraries: Look for templates and plugins that fit your project needs. Many online resources offer free and paid options.
Install and Use: Incorporate these templates and plugins into your projects to add sophisticated effects, transitions, and animations quickly.
Customize: Adjust templates and plugins to match your specific requirements, ensuring a unique and polished final product.
Insider’s Secret
Plugins can dramatically speed up your workflow by automating repetitive tasks and adding advanced features. Explore libraries like Adobe Exchange or third-party sites to find tools that match your needs and elevate your content creation process.
Designing for Aspect Ratio and Resolution

LED screens come in various sizes and aspect ratios, so it’s crucial to design your content accordingly to ensure it looks its best. Here’s how to optimize your visuals for the specific screen you’ll be using:
Step 1: Determine the Screen’s Aspect Ratio and Resolution
Why This Matters: Knowing the exact aspect ratio and resolution of the LED screen ensures your content will be displayed correctly without distortion or pixelation.
How to Do It:
Obtain Specifications: Get the precise aspect ratio (the ratio of width to height) and resolution (the number of pixels, e.g., 1920x1080) from the screen’s manufacturer or rental company.
Common Aspect Ratios: Be familiar with common aspect ratios such as 16:9 (standard widescreen), 4:3 (traditional TV), and 1:1 (square screens). Each has specific design requirements.
Consider the Setup: Understand how the screens will be arranged if there are multiple screens or non-standard configurations. This affects how you design your content.
Step 2: Create Visuals in the Exact Resolution of the LED Screens
Why This Matters: Designing your content in the exact resolution of the LED screen ensures that your visuals are sharp, clear, and free of distortion.
How to Do It:
Set Up Your Canvas: In your design software, set the canvas size to match the exact resolution of the LED screen (e.g., 1920x1080 pixels).
Maintain Quality: Use high-resolution images and graphics to avoid pixelation. Ensure all assets are designed or scaled to match the screen’s resolution.
Preview and Adjust: Regularly preview your designs at 100% scale to ensure they look sharp and detailed.
Step 3: Use Safe Zones in Your Design
Why This Matters: Safe zones ensure that critical elements of your design (like text and logos) are not cut off at the edges of the screen, providing a better viewing experience.
How to Do It:
Define Safe Zones: Typically, the safe zone is about 5-10% inward from each edge of the screen. This area guarantees that all important content remains visible regardless of the screen’s physical setup or any slight misalignment.
Place Key Elements: Keep crucial information such as text, logos, and key visuals within this safe zone to prevent them from being cropped out.
Test and Adjust: Preview your design with the safe zone in mind, making sure all essential elements are well within the boundaries.
Heads Up: Always Keep Critical Information Within the Safe Zone
Why This Matters: During the event, screens can sometimes be misaligned or partially obscured. Keeping critical information within the safe zone ensures that nothing important gets cut off or missed by the audience.
Quick Tip
Design a mock-up or use a template that clearly marks the safe zones. This will help you visualize how your content will appear on the screen and ensure all vital elements are appropriately placed. By following these steps, you'll create content that looks great and communicates effectively on LED screens of any size or configuration.
Types of Content: Images vs. Video vs. Interactive
Imagine transforming your event into an unforgettable experience with captivating visuals and dynamic displays. Different types of content—static images, videos, and interactive elements—each serve unique purposes and can elevate your event in exciting ways. Understanding how to effectively utilize these diverse content types is the key to making the most of your LED screen and leaving a lasting impression on your audience.
1. Static Images
Static images are simple yet powerful tools for delivering clear and impactful messages. They are particularly effective for displaying logos, infographics, or key messages, ensuring that important information is conveyed quickly and efficiently.
Best Practices:
Use High-Resolution Images: Ensure your images are at least 300 dpi to maintain clarity and sharpness when scaled to large sizes. This prevents pixelation and ensures a professional appearance.
Match the Screen's Aspect Ratio and Resolution: Design your images to fit the exact dimensions of the LED screen. This avoids distortion or cropping, ensuring your visuals look their best.
Incorporate Branding Elements: Include your company’s logo, colors, and fonts in your designs to maintain brand consistency and reinforce brand identity.
Keep It Simple: Avoid cluttered designs by focusing on one key message or image per slide. This enhances readability and impact.
Tip: Less is more! A clean, simple design is often more effective than a busy, cluttered one.
Applications:
Company Logos: Display your company logo during breaks or transitions to reinforce brand identity and maintain a professional look throughout the event.
Promotional Graphics: Use static images to highlight new products, services, or promotions, making it easy for attendees to absorb and remember key information.
Event Schedules: Provide clear and easy-to-read schedules or agendas for attendees, helping them stay informed about the event’s timeline.
Sponsor Acknowledgments: Feature sponsor logos and messages to recognize their contributions and show appreciation for their support.
2. Video Content

Video content is highly engaging and dynamic for both indoor and outdoor events, making it perfect for showcasing company achievements, event highlights, or promotional material. It brings your event to life and captivates your audience with movement and sound.
Best Practices:
Render at the Screen’s Resolution and Refresh Rate: Ensure your videos are produced in high resolution (1080p or 4K) and match the screen’s refresh rate (typically 60Hz) for smooth, high-quality playback.
Use Professional Editing Software: Tools like Adobe Premiere Pro and After Effects allow you to add high-quality effects, transitions, and sound to your videos, enhancing their impact and professionalism.
Incorporate Clear Audio: Ensure the audio in your videos is clear and well-balanced. Use professional voiceovers and background music that complement the visuals and enhance the overall experience.
Keep Videos Concise: Aim for 2-3 minutes per video to maintain audience attention. For longer content, consider breaking it into shorter segments to keep viewers engaged.
Did You Know? The first 10 seconds of your video are crucial. Make them count to grab your audience’s attention right from the start!
Applications:
Event Introductions: Start your event with a high-energy intro video that sets the tone and engages the audience, creating excitement and anticipation.
Promotional Reels: Highlight company achievements, new products, or upcoming events with dynamic promotional videos that capture attention and interest.
Live Feeds: Stream live footage of the event, including speeches, performances, or audience reactions, to create a sense of immediacy and involvement.
Employee Spotlights: Feature short clips showcasing employee achievements or testimonials to build a sense of community and highlight the human side of your organization.
3. Interactive Content
Interactive content, such as live polls, social media feeds, and touch-based applications, can significantly increase audience engagement. Here’s how to implement and optimize these interactive elements:
Best Practices:
Design Intuitive and Responsive Interfaces: Ensure that interactive elements are user-friendly and respond quickly to input. Clear navigation and responsive design are key to a positive user experience.
Test Interactivity Thoroughly: Conduct multiple tests to ensure all interactive features work smoothly on the LED screen. Test in different scenarios to catch any potential issues before the event.
Use Real-Time Data: For elements like polls and social media feeds, ensure data is updated in real-time. This keeps the content relevant and engaging for the audience.
Keep User Experience in Mind: Design with the audience in mind. Make interactions straightforward and enjoyable, avoiding overly complex or confusing elements.
Engagement Tip: Encourage audience participation with clear instructions and prompts on how to interact with the content. This can be done through on-screen messages or verbal announcements.
Applications & How To’s:
Real-Time Voting: Conduct live polls where attendees can vote on questions or topics using their smartphones. For example, use a platform like Mentimeter or Slido to create polls. Display the results instantly on the LED screen to keep the audience engaged and involved.
Implementation: Set up a poll using an interactive polling platform. Share the link or QR code with the audience. As votes come in, the results are dynamically displayed on the LED screen, providing immediate feedback and interaction.
Q&A Sessions: Allow attendees to submit questions in real-time, which can be displayed on the screen for speakers to address. Platforms like Pigeonhole Live or Sli.do can facilitate this.
Implementation: Use a Q&A platform to collect questions from the audience. Display selected questions on the LED screen during the Q&A session, enabling the speaker to address them directly. This encourages participation and makes the session more interactive.
Social Media Walls: Display a live feed of social media posts tagged with the event’s hashtag to encourage online interaction and engagement. Tools like Walls.io or Hootfeed can aggregate these posts.
Implementation: Set up a social media wall using an aggregator tool. Configure it to display posts with the event's specific hashtag. This can motivate attendees to share their experiences online, knowing they might see their posts featured live.
Interactive Maps: Provide touch-based maps of the venue, allowing attendees to explore different areas and find points of interest. This can be particularly useful for large events or conventions.
Implementation: Develop an interactive map application that includes details about different areas of the venue. Attendees can use touch screens to navigate the map, locate sessions, booths, or amenities, and get more information about each area.
Optimizing Content for LED Screens
To ensure your content looks its best on LED screens, focus on color calibration, motion graphics, and typography. Here’s how to optimize each aspect effectively:
1. Color Calibration
Calibrating colors to match the LED screen’s display capabilities ensures that your content's colors appear as intended.
Steps to Follow:
Use Color Profiles: Apply color profiles that match the LED screen’s specifications during content creation. This helps in maintaining color accuracy.
Test Content on Actual Screens: Display your content on the LED screens in the event environment to see how the colors appear in real-life conditions.
Adjust Colors as Needed: Make fine adjustments to the colors based on the test results to ensure accurate and vibrant color representation.
Fun Fact!
The human eye can distinguish millions of colors, so proper color calibration ensures your content stands out with vivid and accurate colors!
2. Motion Graphics and Animations
Motion graphics and animations can greatly enhance the visual appeal of your content, making it more engaging and dynamic.
Steps to Follow:
Use Keyframe Animations: Keyframes allow for precise control over motion, ensuring smooth and professional-looking animations.
Add Motion Blur Effects: Applying motion blur can make movements appear more natural and less jarring to the viewer.
Test Animations for Performance: Run your animations on the LED screens to ensure they play smoothly without causing performance issues.
Did You Know?
Adding subtle motion blur to your animations can make them look more natural and professional!
3. Typography
Readable typography is crucial for conveying messages effectively on LED screens.
Steps to Follow:
Choose Large, Bold Fonts: These fonts are easier to read from a distance and in various lighting conditions.
Use High Contrast Colors for Text: Ensure your text stands out by using colors that contrast sharply with the background.
Avoid Overly Decorative Fonts: Stick to simple, clean fonts as they are more legible and effective for quick communication.
Typography Tip
Use sans-serif fonts for maximum readability on screens. Their clean lines and simplicity make them ideal for LED displays!
Testing and Final Adjustments

You’re now almost ready for the big event! Testing and making final adjustments are crucial steps to ensure your content displays perfectly during the event.
Pre-Event Testing involves scheduling a test run with the actual LED screens to see how your content performs in the event environment. During this test, check for any issues related to resolution, color accuracy, and playback performance. Make the necessary adjustments based on your findings to fine-tune your content, ensuring it looks perfect when displayed. It’s a good idea to conduct multiple test runs at different times of the day to see how varying lighting conditions affect your content. This will help you identify and resolve any potential issues before the event starts.
Real-Time Adjustments are necessary during the event itself, as unforeseen issues can arise. Monitor the content continuously to catch any problems early. Be prepared to make quick changes by having the necessary tools and software on hand, such as a laptop with the design software, media files, and backup content. For instance, if a video isn’t playing correctly, you can quickly re-encode or swap it out with an alternative file. Additionally, having backup content ready, such as a slideshow or static images, ensures that you can switch to these alternatives seamlessly if the primary content encounters issues.
Quick Fix: Always have a backup USB drive with alternative content ready to go in case of technical difficulties!
Best of luck with your upcoming event!
Bringing your event to life with stunning LED screen imagery is a rewarding blend of creativity and technical skill. By understanding the nuances of LED screens and adhering to best practices in content creation, you can craft visuals that not only look fantastic but also elevate the entire event experience. With the right tools, techniques, and a meticulous approach, your LED screen content will captivate and engage your audience, creating memorable moments that stick with them long after the event is over. So, dive in, unleash your creativity, and transform your next event into an unforgettable spectacle!
Ready to transform your next event with stunning LED screen imagery? At Stellar XP, we specialize in bringing your vision to life with our top-of-the-line LED screens, expert content creation and event management services. Whether you're looking to dazzle your audience with dynamic video content, engaging interactive elements, or crisp static displays, we've got you covered. With multiple large LED screens for rent, we’ll help you put on a stunning show. Click the button to learn more about our services.